We’re looking forward to the day we can move Baby Boo into sharing with Bubby in her room. I’ll admit that it’s mostly so we can selfishly reclaim the study/guestroom and not have to sneak in while Boo’s asleep to grab the bottle of wine we’d forgotten to get out earlier. But we’re not there yet so in the meantime I’ve been slowly setting Bubby’s room up to suit both girls.
I remember having to share a room growing up with Lex and how my bed on the bottom bunk was the only space that felt like it was my own and wanted to create something special for Bubby to claim as hers. Like most little kids, the concept of sharing is often begrudging and whilst at the moment Bubby can pretty much play with whatever she pleases, it’s not always going to be the case. So I’m using these little shadow boxes to install a place above her bed that Bubby can display some of her pride and joy belongings – and away from Baby Boo’s curious little hands.

What you’ll need:
- Plywood shadowboxes
- Stain & Varnish
- Paintbrush or rag
- Fabric
- Heat’n’Bond adhesive
- Stiff cardboard
- Metal ruler
- Rotary blade & cutting mat
- Iron & ironing board
- Felt balls
- Braided beading thread
- Needle
- Scissors
- Hammer
- Nails/hooks suitable for your wall lining
House Shadow Boxes
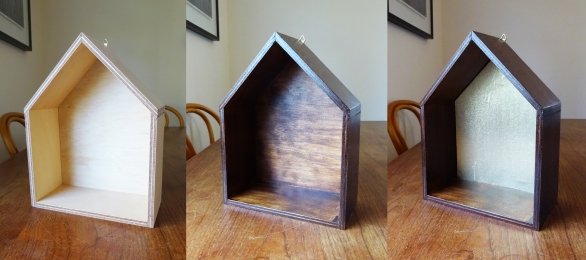
I purchased my shadow boxes pre-assembled from the lovely Kate at Little Dwellings. The natural ply finish they come in is great, but wasn’t suitable with the existing décor in Bubby’s room and I wanted to personalise them by changing their colour and adding a fabric finish to the back face of the boxes.
I chose a Wattyl combined stain and varnish in ‘Walnut’ to co-ordinate with the darkish timber frame of a large artwork and Bubby’s bedside table, a vintage Coogans shelving unit that I’d stripped off, stained and painted some years ago for our old kitchen.
First up, read the instructions on the back of your chosen tin of stain. I used a brush to apply the stain/varnish, but had a few bubbles on the inside face of the boxes so rubbed the stain in with a rag, then brushed the top coat on. I used two coats in total to stop the colour of the light ply from coming through the darker tint and left to dry for about an hour in between.
To make a template for the fabric backing, trace around the shadow boxes on a piece of butchers paper then draw on the thickness of shadow box edge. Using the metal ruler and rotary blade, cut out the shape on the inside of the double lines then see how it fits inside the box. Trim the template to fit snugly inside the box.
Use the template to cut the shapes for the cardboard and Heat’n’Bond. Lay the Heat’n’Bond rough face down on the cardboard and use a warm iron to adhere it to the cardboard for a couple of seconds. Be careful not to overheat the adhesive as it can loose its ‘stick’. Peel the backing off the adhesive and lay the fabric over the top. I chose to use a delicate Japanese gold lamé fabric to give a bit of shimmer against the dark timber, but the lame fabric is quite thin and the adhesive can come through onto the iron and then spread over the fabric so I laid a sheet of baking paper over the fabric before ironing for 4-6 seconds. Make sure all the fabric is stuck down right to the edges, but again move quickly to avoid overheating. With fabric face down, use the rotary cutter and ruler to trim the fabric against the edge of the cardboard shape. Insert into the shadow boxes. I’ve left mine so I can take them out if I change my mind later, but if they don’t stand up use a bit of double sided tape to keep them in place.
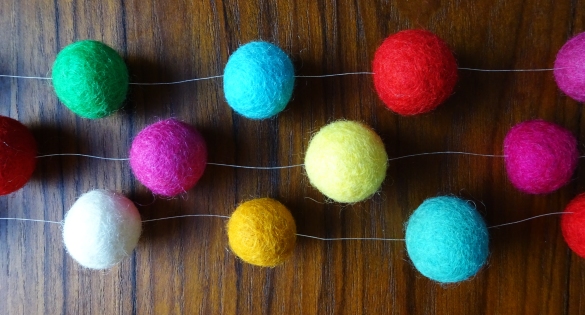
Felt Garland
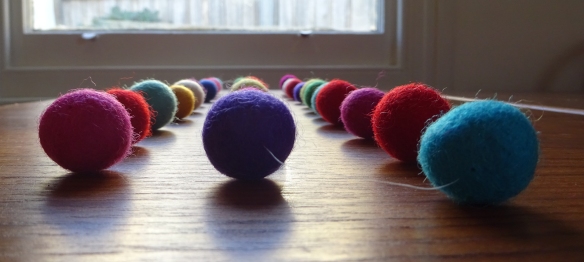
I came across these felt balls amongst some art supplies my mum gave me, but if you feel so inclined you can follow my sparkle blog’s very easy step by step instruction on making them from scratch. These are also the instructions I used to make my garland. I used braided bead thread on a thin needle to string together the balls and to secure the ends, I double backed the thread through the last balls and tied in a small knot.
Whilst I can and like to use a hammer, getting the three boxes hung up in a row and evenly spread isn’t my specialty so Builder Dave came to the rescue and quickly did a nice tidy job for me. But artfully draping the garland was definitely all me.

Interested in more Projects?
